Supercover Ink Printing Technique
There are two main methods used for screen printing:
1. Direct printing - placing the screen directly onto the item
2. Off contact/ elevated printing - raising the screen above the item.
Which method do you need to use??
It can get a bit confusing as it varies on both the item and the ink your using. Just think if the item or ink will be absorbed or sit on top of the item - if on top you need to elevate.
Here's a simple guide to remember:
Direct - absorbent materials i.e. t-shirts, paper, wood, clay.
Off contact/ elevated - non-absorbent materials i.e. plastic, glass, metal, glazed ceramics.
Direct - standard fabric inks for white and light colours/ poster paints for paper & cardboard.
Off contact/ elevated - Supercover fabric inks onto black and dark fabrics/ Akwa tile and glass paint.
This blog explains off contact/ elevated printing using Supercover inks. The same elevated screen process appliess for printing glass, metals, plastic, glazes ceramics and other non-absorbent materials.
Q) When should you be elevating your screen to print?
A) When ever the material underneath is not absorbent, or your ink will stick/ dry in the screen during printing you must print off contact.
Q) Can I print Supercover inks onto white/ light fabrics?
A) Yes you can, however you will still need to elevate the screen and print off contact or the thicker Supercover ink will stick in the design and cause a patchy print. Supercover inks will provide a very thick sold print onto whilte fabrics.
Why are Supercover inks so much thicker?
Supercover inks have a much thicker consistency compared to standard inks with a solid coverage base and much higher concerntration of pigments required to cover the black underneath. Thge higher concentration of pigments is also why Supercover inks are more expensive than standard colours.
When printed, supercover inks do not completely absorb into the fabric - part of it does, part stays on top as it's so thick. When printed directly, as the screen is lifted, the thicker top sticks to the mesh and is often lifted back up giving a patchy print.
By elevating the screen when printing, the screen travels down to print the item with the squeegee, then immediaely lifts back up after the squeegee blade has passed (imagine the squeegee blade as a giant V with the ink in front and nothing behind), the ink has nothing to hold onto so remains on the item below.
It's not a complex or advanced process, however does involve some extra equipment to ensure this problem is easily avoided.
Here's a simple to follow guide to help you - download and read it - use table adhesive and elevate your screen.
Old printing techniques provide poor results using modern equipment
If you have screen printed before (probably way back at school) you will remember having to push hard on the squeegee with both hands to make a print - well times have certainly changed, using that technique with modern inks and squeegee’s will provide a very poor quality print.
Our professional squeegees and inks have changed two basic elements of traditional screen printing:
- The angle of the squeegee is held upright at about 60-70 degrees
- Less pressure is used with the squeegee when printing
Off contact printing will require slightly more squeegee pressure than direct printing to push the mesh downwards onto the item, however it’s not the pressure applied to the squeegee that pushes the ink through the screen and onto the item below, it is the sharp edge of the squeegee blade that pulls a layer of ink through the screen mesh, which is designed to regulate the amount of ink that passes.
Let the squeegee and ink do the work for you. Too much pressure will blur your design and reduce print quality.
Download the PDF details here.
Setting screen height
The process involves raising the height of your screen above the item you are printing. The raising of the screen ensures the mesh is not in contact with the item before or after printing and ‘snaps’ back after the squeegee has passed over the design.
When the screen is not raised you will actually pull a layer of ink back off the item when you lift your screen - this is why the item may appear patchy (as whilst your print was perfect, the wetness of the ink and heavy pigment load sticks to the strands of the mesh).
Raising the screen and ‘snapping’ back to a height above the item, the screen does not remain in contact with the item, so when it is lifted after printing the mesh is already away from the item and does not stick to the design [leaving all the ink on your item].
A screen printing jig, or jig hinges, makes ‘off contact’ printing faster, easiest and most importantly accurate as you simply insert a few plastic height adjusters (product code: S-9112) under the frame. The arm of the jig will hold the screen in perfect registration for each print.
This process is also called ‘snap’ or ‘elevated’ printing. Information sheet #08 details the process of setting up a screen for off contacting printing in detail.
Keep the squeegee angle upright
Resist the temptation to press hard and lower the squeegee angle to 'push' more ink through the screen. You will receive a sharper and more detailed image printing 2-3 times rather than 1 heavy print. The denser pigments in the ink can not all pass through the mesh in 1 print so by performing 2 prints you put down a set of 2 sharper layers that stack on top each other and to give a sharp solid print. You should hear the rippling noise of the blade passing over the mesh strands as you print.
Use slighty more pressure
As the screen must travel downwards to touch the item, you will find yourself naturally using more pressure to print, use caution not to press to hard and flood the screen with ink.
This point is used in conjunction with both the previous point of squeegee angle and the next point of keeping the screen clean of ink after printing - it is adjusted to suite your printing technique, the elevated height of the frame and consistency of the ink you are using.
Keep the design free of ink
The elevation of the screen, higher angle of the squeegee and increase in pressure on the squeegee blade should ensure that your design in the screen is clean after printing.
Keeping the design area of the screen clean after printing is a sign of a good print.
If the design area is not clear then not all the ink has passed onto your design and it’s going to look patchy or faint. Ink left in the screen will also dry making subsequent prints worse - ultimately you’ll have to stop and clean the screen down in water.
Look at your screen, not the print
After printing you will naturally look at the print, however more importantly look at your screen after printing, as it’s the health of the screen that is more important to your overall printing.
A clean and healthy screen will continue to give you sharp quality prints.
You will notice problems with your screen before anything happens to the prints on your garments, so acting before things happen will save you troubles, miss prints and valuable time.
1. Part of the design with ink still in it
Remove with a clearing print after your passes. If this does not clear the ink you may be required to perform your clearing print onto paper not onto the item after printing [the paper is more absorbent than the ‘wet’ fabric you have just printed].
If ink continues to dry in the screen you must then either adjust the ink (by adding Fabric Ink Retarder) or the printing technique by flood coating the design. Retarder is recommended as he first option as flood coating involves pushing the ink back across the design area after printing to cover the area with wet ink. You are required to have more ink on the screen for this process and works best with thinner/ runny inks (not normally required for opaque Fabric Inks).
2. Excess ink building around the edges of the screen
This is a normal part of printing, however you should return the ink to the container and stir to ‘work the ink back in’. If you leave it too long it will start to dry and may then thicken your ink supply.
If ink continues to build regularly then you may be using too much ink or the pressure of the squeegee is too great as the ink is being forced off the squeegee to the sides.
Increase the number of passes
Most prints using Supercover inks will require two or three passes of the squeegee for complete coverage of ink onto the garment below.
Remember that 2-3 passes using a consistent and even pressure - not heavy - will produce a clear, solid image. One heavy pass will flood the screen with ink, blur the design and give you no greater coverage at all.
Items can only absorb a set amount of ink in one pass, so multiple passes with less ink will produce a clearer result, as you layer and blend the ink instead of forcing it onto the material.
High synthetic materials such as polyester and lycra may require drying between passes.
Print the first layer then lift the screen and touch dry using a hair drier or heat gun (your not setting the ink just touch drying the ink), then lower and print again. Note this process only recommended when using a screen printing jig.
Use Table Adhesive
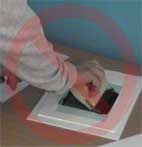
A commonly forgotten aspect of printing supercover ink is the very important issue of holding your item still/ flat when printing - this is achieved using Table Adhesive under your item when printing.
If you do not use Table Adhesive, although you have raised the height of your screen, the item will lift up and stick to the back of the screen eliminating all the other work you have done.
Table adhesive is an inexpensive and critical part of the process that should not be forgotten. Applied to the board under your print area to hold your item still whilst printing - avoiding movement, smudges, misprints, blurring, etc.
Apply 1 drop every 7-10cm and spread evenly over your printing board and allow to dry.