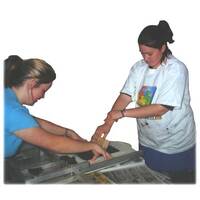
Screen Printing Technique (direct printing)
There are two main methods used for screen printing:
1. Direct printing - placing the screen directly onto the item
2. Off contact/ elevated printing - raising the screen above the item.
Which method do you need to use??
It can get a bit confusing as it varies on both the item and the ink your using. Just think if the item or ink will be absorbed or sit on top of the item - if on top you need to elevate.
Here's a simple guide to remember:
Direct - absorbent materials i.e. t-shirts, paper, wood, clay.
Off contact/ elevated - non-absorbent materials i.e. plastic, glass, metal, glazed ceramics.
Direct - standard fabric inks for white and light colours/ poster paints for paper & cardboard.
Off contact/ elevated - Supercover fabric inks onto black and dark fabrics/ Akwa tile and glass paint.
This blog deals with direct printing only.
For off contact/ elevated printing see our other blog post or download the pdf information sheet now.
Old printing techniques provide poor results using modern equipment
If you have screen printed before (probably way back at school) you will remember having to push hard on the squeegee with both hands to make a print - well times have certainly changed, using that technique with modern inks and squeegee’s will provide a very poor quality print.
Our professional squeegees and inks have changed two basic elements of traditional screen printing:
The angle of the squeegee is held upright at about 60-70 degrees
- The higher angle lets the sharp edge of the blade do the work for you
- Angles too low force the ink through the screen and bleeding will result
Less pressure is used with the squeegee when printing
- The blade on the squeegee should not flex or bend whilst printing
- You don’t need to push the ink through the screen - the ink will naturally be drawn through onto the material below - you just need to guide the squeegee with even pressure
Let the squeegee and ink do the work for you.
It’s not the pressure applied to the squeegee that pushes the ink through the screen and onto the item below, it is the sharp edge of the squeegee blade that pulls a layer of ink through the screen mesh, which is designed to regulate the amount of ink that passes.
Excess pressure will blur your design and reduces print quality.
Basic Technique
Download the PDF details here.
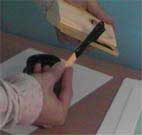 |
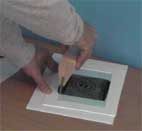
1. With your screen mounted to a frame, place over some paper ready for a test print. 2. Dip an ink knife into the ink and laden the squeegee blade with the ink ready to commence printing |
 |
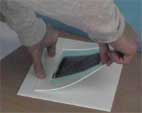
3. With sufficient ink on the blade, about 7-10mm thick, place the squeegee onto the edge of the screen, then lower the blade and rock forward & back 3 times to transfer this ink onto the screen and then bring the angle back up ready to print Note: Rocking to transfer the ink is only required on the very first print to ensure ink transfer to screen - this is not required for subsequent prints. |
 |
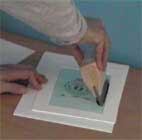
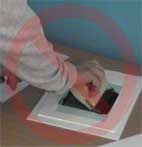
4. Pull the squeegee across the screen at an angle of approx. 70 degrees from one side to the other. |
 |
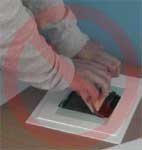
5. Once you have passed over the design, raise the squeegee angle back to vertical to ‘pick up’ the ink off the screen and remove from the squeegee. |
 |
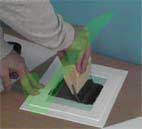
5. Rest the squeegee to the side and lift the frame in a hinge motion to reveal the print A hinge motion is used to avoid smudging/ blurring the print. Hold the frame on one side. - If a print is too light, simply lower the frame back down and perform another print, as the hinge effect holds the frame in place without moving the design. - Jig hinges or a screen printing jig/ carousel will also ensure the's no movement between prints. |
  |
|